Imitation Learning Policy
Imitation learning is a type of machine learning where a model is trained to imitate the behavior of an expert. In this case, the expert is the driver of the car. The model is trained to imitate the behavior of the driver by learning from the dataset collected from manual driving.
This tutorial will guide you through the process of training an imitation learning policy using a dataset collected from manual driving. The main steps are:
- Collect a dataset of expert driving demonstrations suitable for training a policy.
- Process the data to create individual training examples.
- Train a neural network to imitate the behavior of the expert.
- Deploy the trained network on the autonomous vehicle and evaluate the policy's behavior.
Prerequisites
- Ensure that you've calibrated your car and gotten the Navigation Stack working.
Learning Objectives
- Students can collect a dataset of expert driving demonstrations suitable for training a policy.
- Understand data processing to transform the recorded data into data suitable for training a policy.
- Gain hands-on experience with the neural network training process.
- Learn how to roll out the trained policy on the autonomous vehicle and evaluate the policy's behavior.
Tutorial Steps
We will use behavior cloning to train an imitation learning policy.
In particular, we are going to train a neural network to approximate the behavior of the driver. The neural network will take as input a short sequence of camera images and output vehicle velocity and steering angle commands.
We will record data by having an expert demonstrator (you) drive the car around while recording images and joystick commands.
The process of behavior cloning will teach the neural network to imitate your commands given the images as input. For example, imagine as you drive the car around that all you can see is the image from the camera. How would you control the car? This is what we will be teaching the neural network.
This process requires several careful considerations. First, the car will only be able to approximate the behavior that it has seen. That is, if it sees a new image, unlike anything it's seen before, it won't know what to do and could output a command that seems random. This is the problem of "out of distribution" data. The new image is outside of the distribution of images that the policy has seen during the training process. Second, how well you control the car will determine how well the policy can drive. For example, if you are training a policy that is intended to drive straight down a sidewalk, but you weave back and forth across the edges of the sidewalk during your recording, the car will learn to weave back and forth across the edges of the sidewalk as well.
1. Data Collection
The process used to collect your dataset and the specific properties of the data will make a large difference in the performance of your policy. Therefore, you should read through this tutorial before beginning the data collection process. The data you collect will define the cars behavior.
-
Start the
record_sensorstmuxinator configuration on your car via ssh or the GUI. -
The gui will show "REC" followed by a red square in the center of the screen when the recorder is running, but not saving data. To toggle recording press the red circle on your joystick.
-
Drive the car around the track.
2. Data Processing
When we recorded our data, it was saved continuously, as it was published by the sensor nodes and received by the recorder. We now need to process this continuous data and transform it into individual training examples that can be used during neural network training. We will also apply data cleaning during this step to remove any data that is not relevant or is incorrect.
There are many choices to be made when transforming the recorded data into training examples, including:
- The data sampling rate
- How data is combined
- What data is extracted for
Our data was recorded as rosbag files. We will use the AV Imitation Annotator to transform the rosbag files into individual training examples.
While the commands here can be run on the car, it is much better to copy the data to a more powerful machine and run the data processing there.
In order to get the data from the car onto your computer, use the rsync command.
For example, on your development machine (not the car), run:
rsync -avP orin@orinXX:roboracer_ws/data/rosbags/ data/rosbags/
Note that the
orinXXhostname will only work on machines that have been properly configured and are connected to the VPN. Alternatively, use the WiFi IP address of the car instead of this hostname, found on the car's display or by runningip aon the car.
Once you've copied the data from your car to your development machine using the rsync command, start the AV Imitation Annotator webapp on your development machine. This tool will allow you to process the rosbag files, extract the relevant data and create a dataset suitable for training a policy.
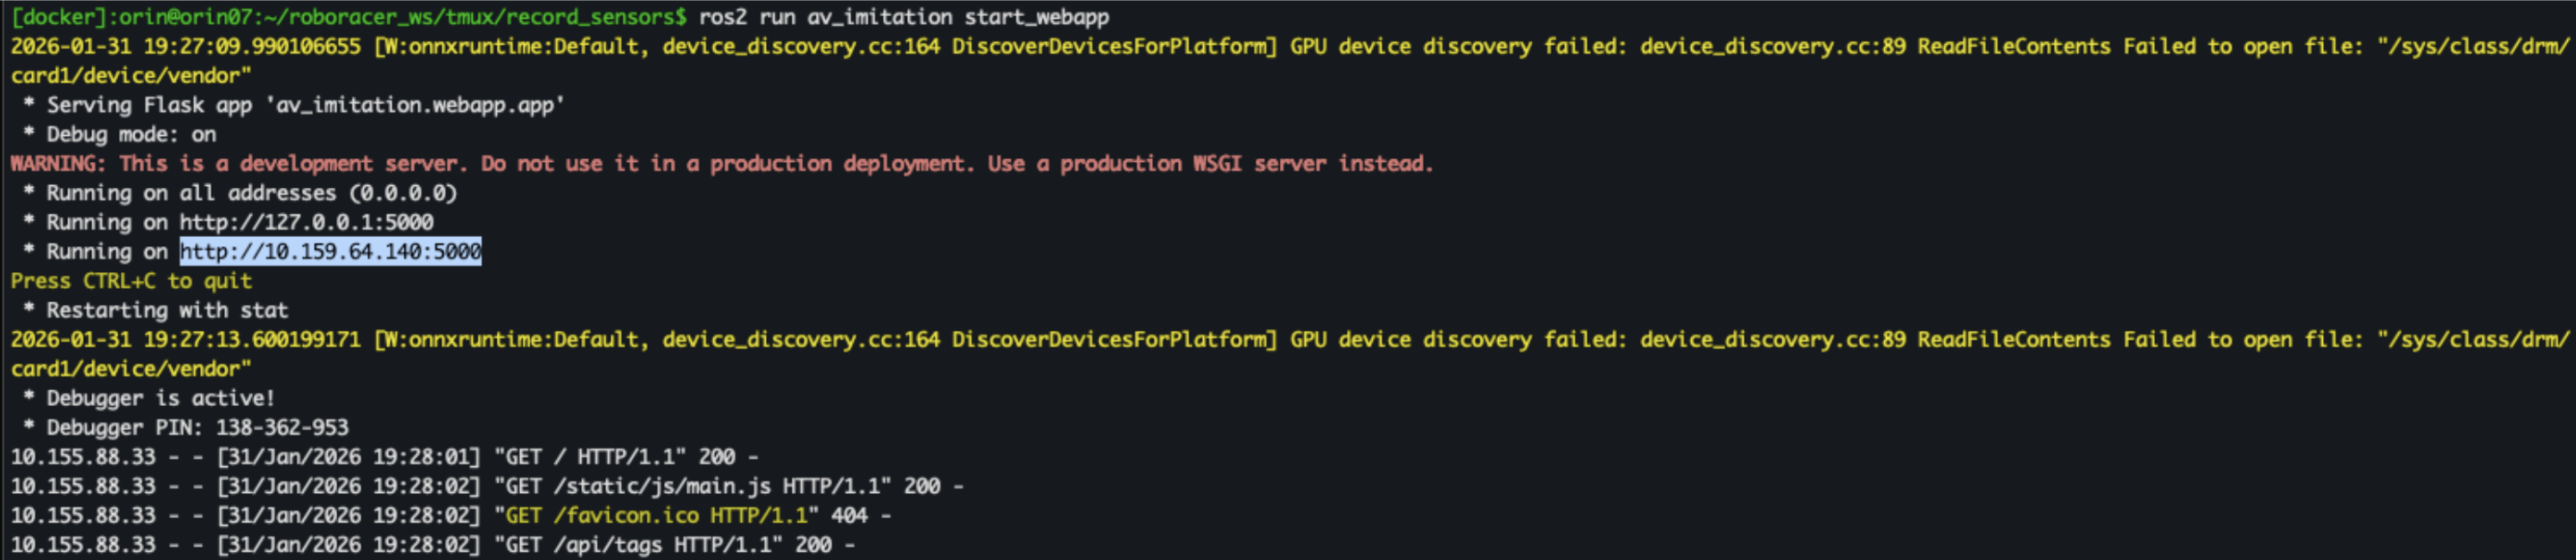
On your development machine, run the following command to start the webapp:
ros2 run av_imitation start_webapp
Then in the browser on your computer, open a web browser and go to the URL highlighted in blue in your tmuxinator command output, as shown in the image.
There are 3 steps in the data processing pipeline corresponding to the 3 tabs: Bags, Dataset, and Visualize.
-
In the Bags tab, you will see a list of rosbag files that were recorded on the car.
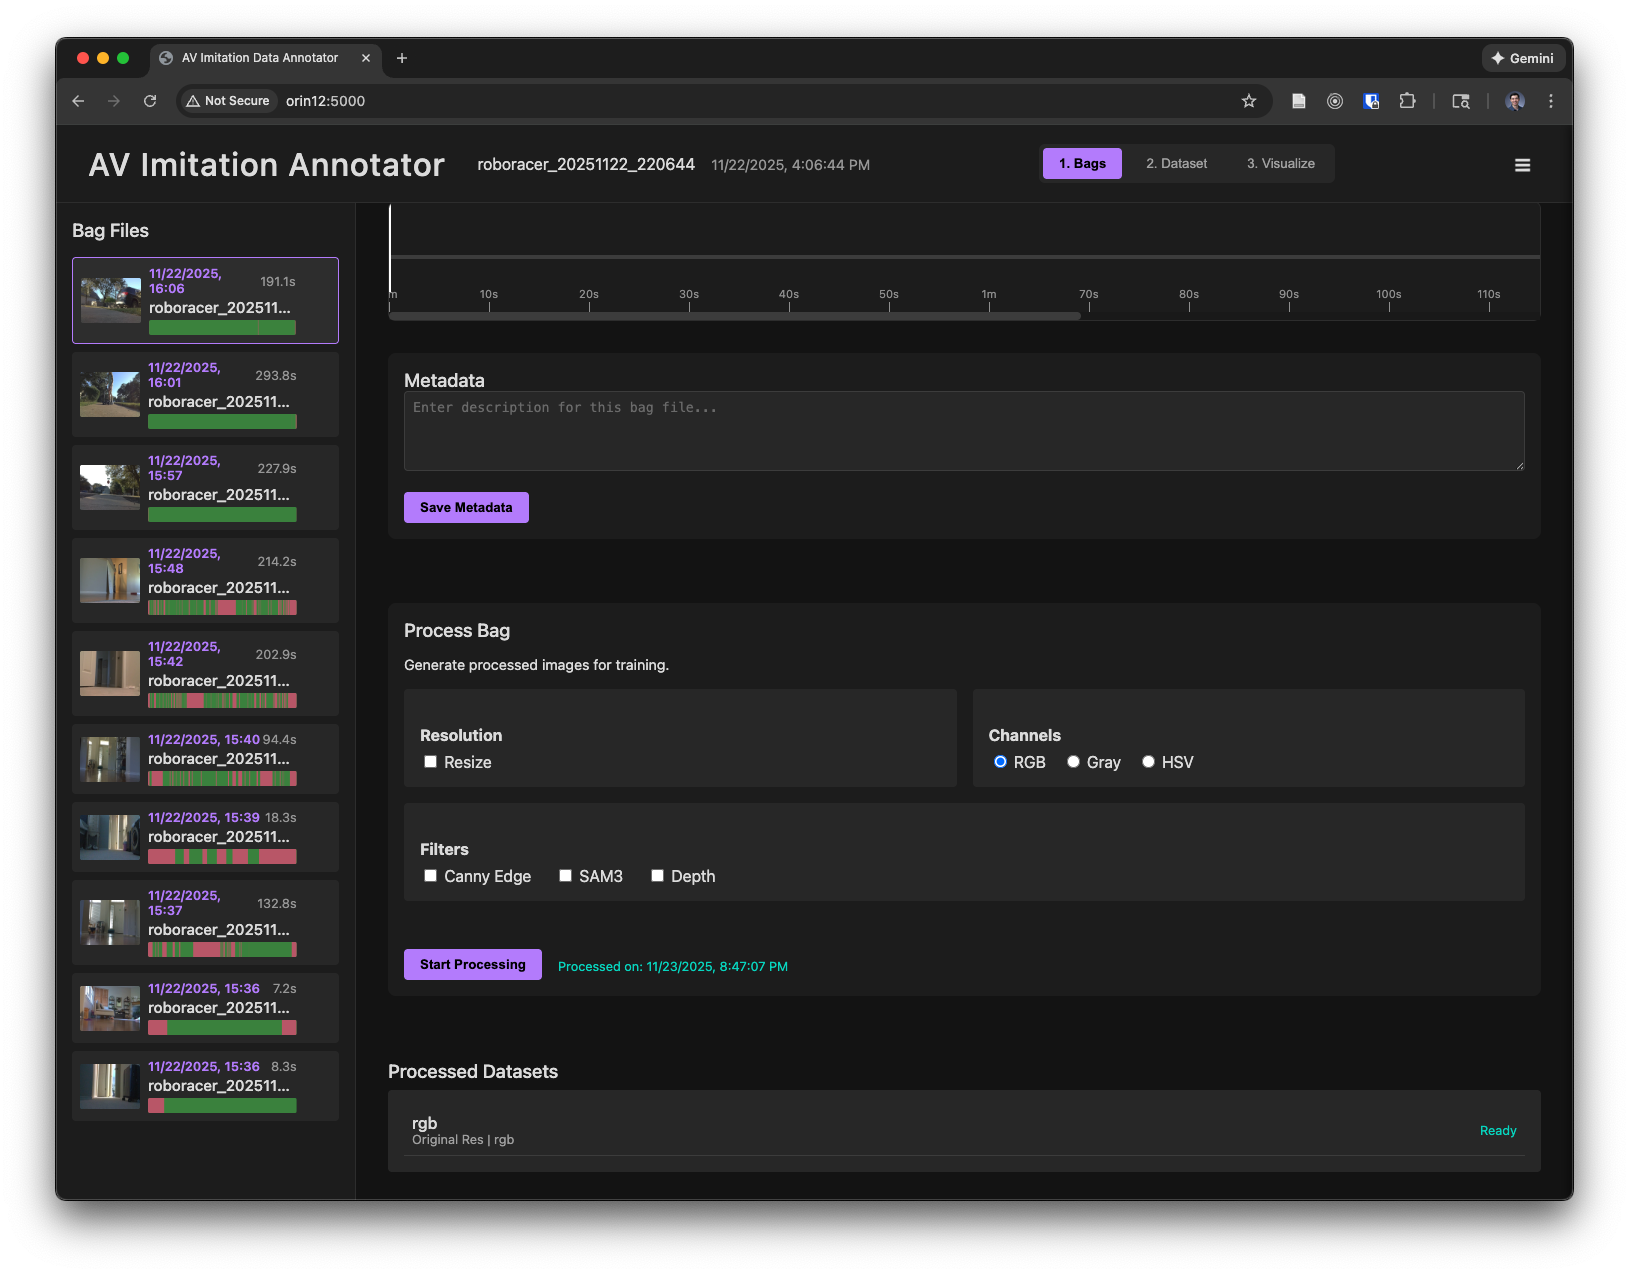
Clicking on a rosbag file will allow you to preview the recorded data.
Playing back the bag will allow you to view the recorded data and see what parts will be included in the dataset. The sections of the timeline marked in red are times when the L1 trigger was not depressed, and therefore will not be included in the dataset.
You can enter any comments in the metadata texbox.
In the Process Bag section, select the image processing options and then click "Start Processing" to extract the images and the actions from the rosbag file and save them as individual images in the dataset directory.
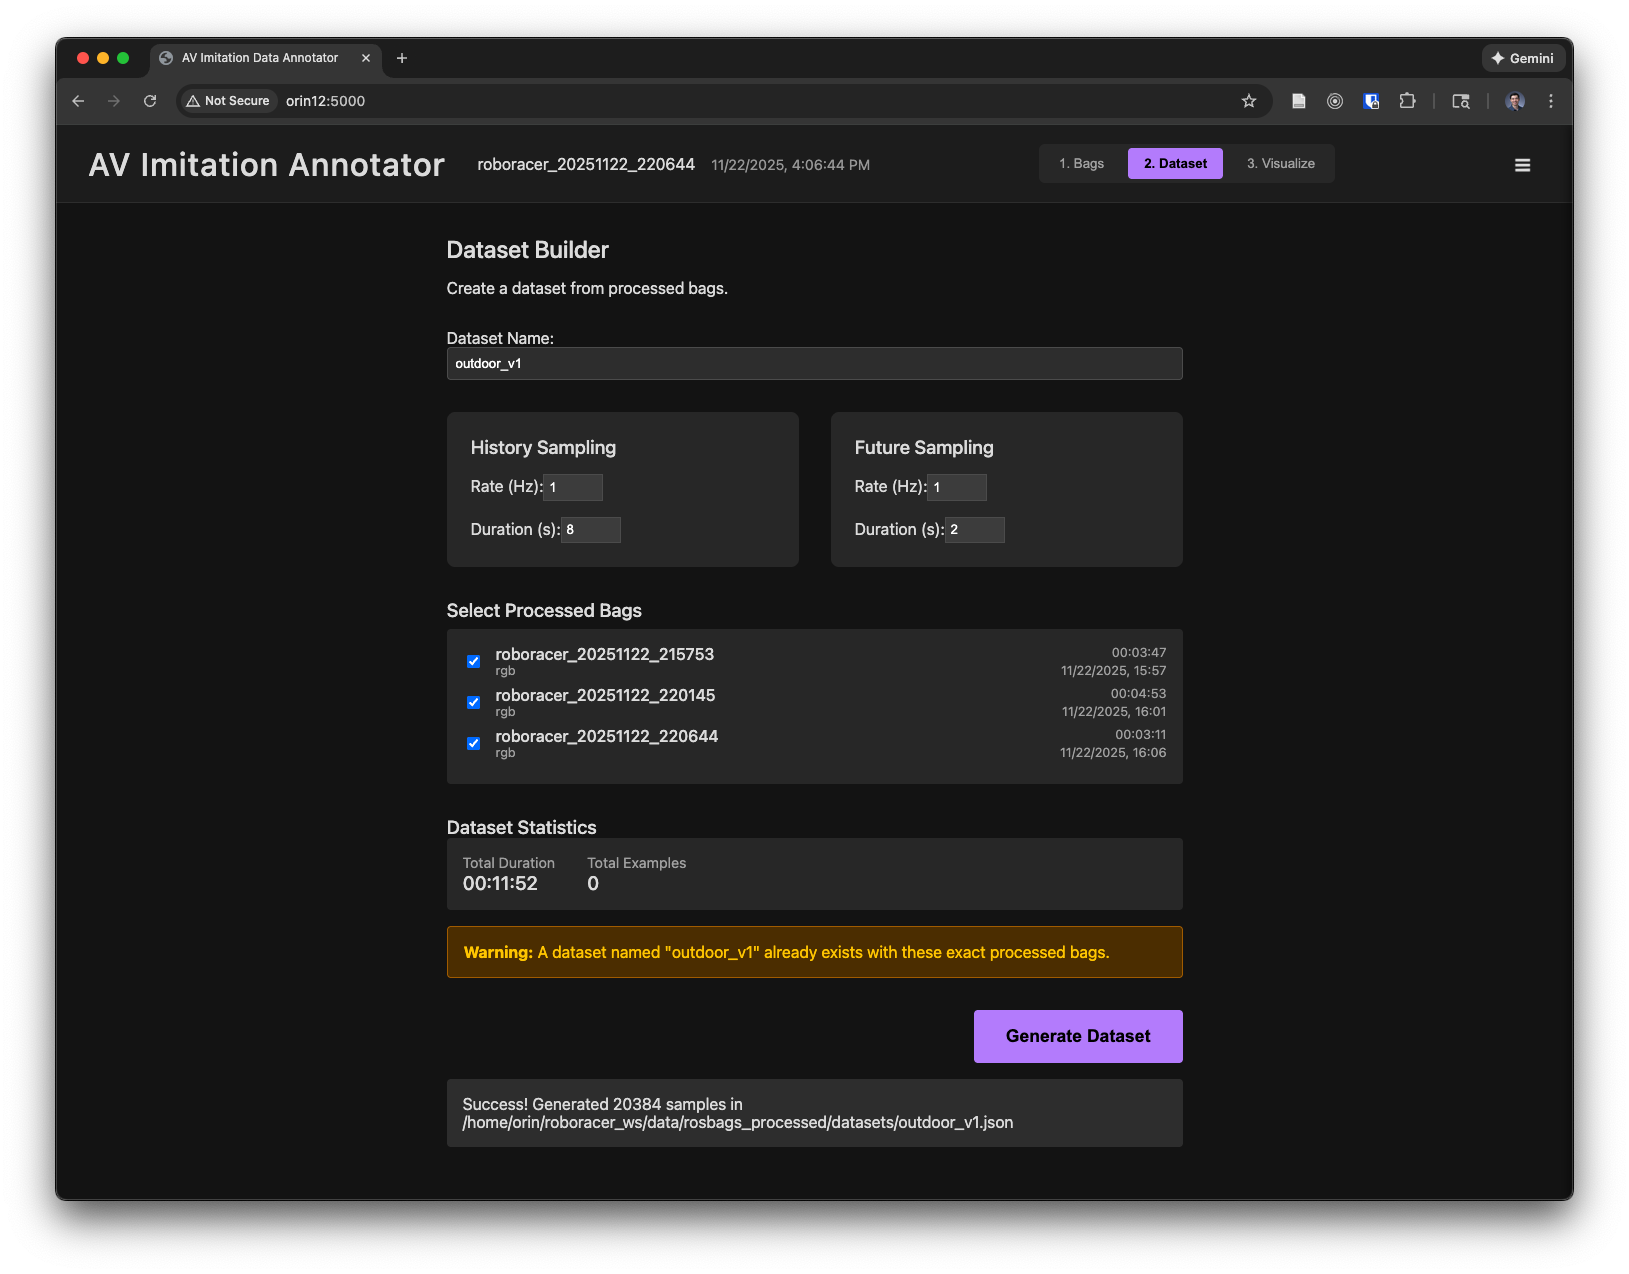
-
The Dataset tab will allow you to compile the extraced data into a dataset suitable for training a policy. Choose the sampling rates and duration of each example before and after the current timestep (you can use the default sampling rates). Then click "Generate Dataset" to create the dataset. This will create a metadata file which references the images and actions in the dataset directory.
-
The Visualize tab will allow you to visualize the dataset and check for any issues. You can select a dataset and click "Visualize" to view the dataset.
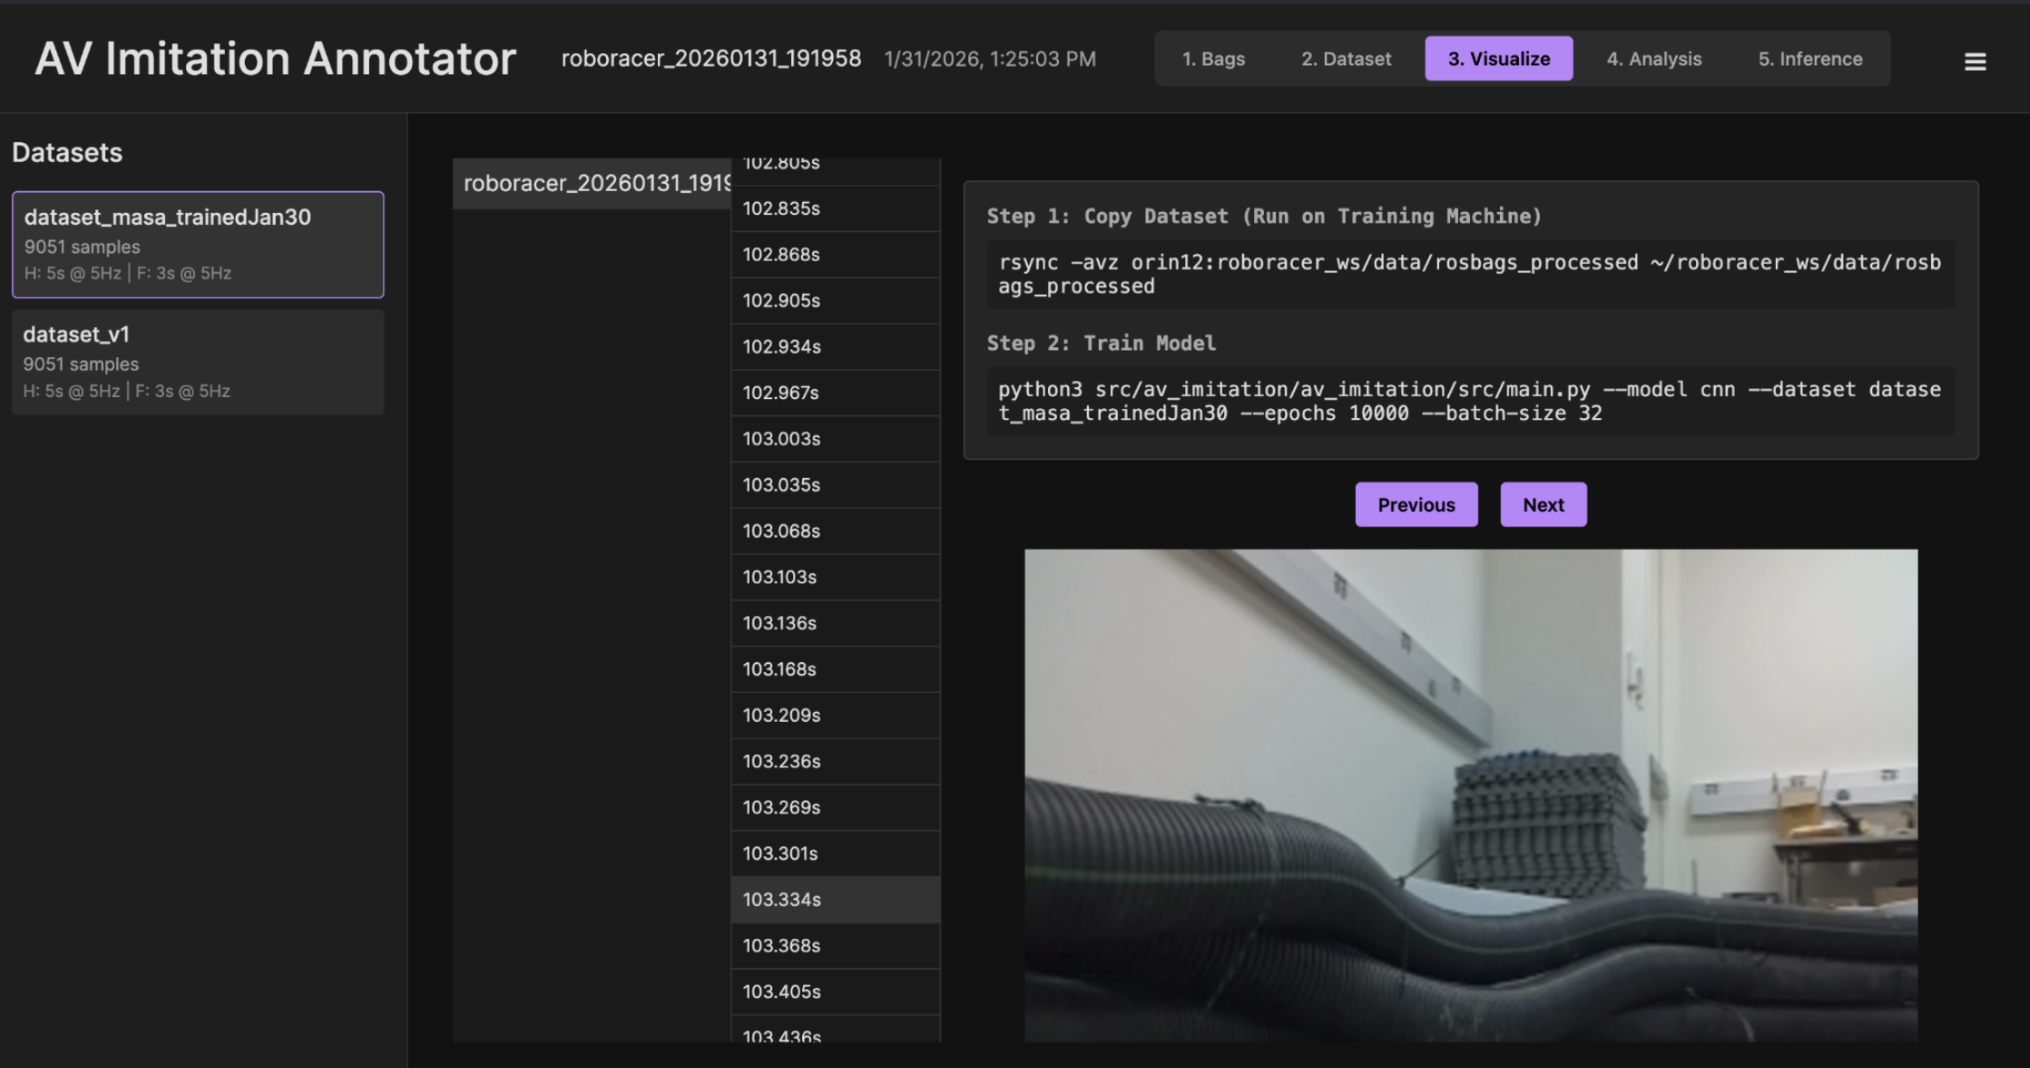
Note: Step 2, the training command, in the image above should only be run on the lab computer. The command is too resource-intensive for the Jetson Orin Nano.
3. Neural Network Training
Note: Neural network training can take some time. Instead of trying to train the network with a single battery, plug in your Jetson Orin into the wall via a power adapter so it can stay on while training.
Now, train the policy inside the container for 1 epoch with a batch size of 4, to test if the training process works:
Note: Replace
outdoor_v1with your dataset name. If--model mlpdoes not work try--model cnn
python3 src/av_imitation/av_imitation/src/main.py --model mlp --dataset outdoor_v1 --epochs 1 --batch-size 4
Starting experiment: 20251124_145208_mlp_outdoor_v1
Using device: cuda
Loading dataset...
Input Channels: 27
Output Steps: 2
Epoch [1/1] Train Loss: 0.0120 Val Loss: 0.0182
Saved best model to /home/orin/roboracer_ws/data/experiments/20251124_145208_mlp_outdoor_v1/models/best_model.pth
Training finished.
Once the test training run successfully completes, you can train the policy for a longer duration by setting the --epochs flag to a higher value and the --batch-size flag to a higher value.
You'll want to pick a number of epochs greater than you will reach before early stopping. Set the --batch-size to a value that will allow the policy training to fit on your GPU, utilizing as much memory as possible, but not exceeding the available memory.
For example, to train the model:
Note: Training will use almost all the memory available on the Orin, so be sure to close any unnecessary processes. Use
htopto check what is running andkill [pid]to stop any unnecessary processes. You can also reduce the batch size to fit on your GPU, however, this will slow down training and possibly reduce the performance of your model.
-
Start a new tmux session outside of the container
-
Split the window into 2 vertical panes
-
In the left pane, run:
Note: Again, replace
outdoor_v1with your dataset name.
./container shell
python3 src/av_imitation/av_imitation/src/main.py --model cnn --dataset outdoor_v1 --epochs 1000 --batch-size 4
- Split the right pane and in the top window run:
jtop
- In the bottom window run:
./container shell
tensorboard --logdir ~/roboracer_ws/data/experiments --port 6006 --host 0.0.0.0
Note: The
tensorboardcommand will allow you to monitor the training process by viewing the training and validation loss curves. You can view the curves by opening a web browser and going to the IP address of the training machine at port 6006. It is possible that someone else is using port 6006 if you are on a shared machine, in which case you can change the port number in the command above and use that port number to view the curves in the browser.
Your terminal will look something like this:
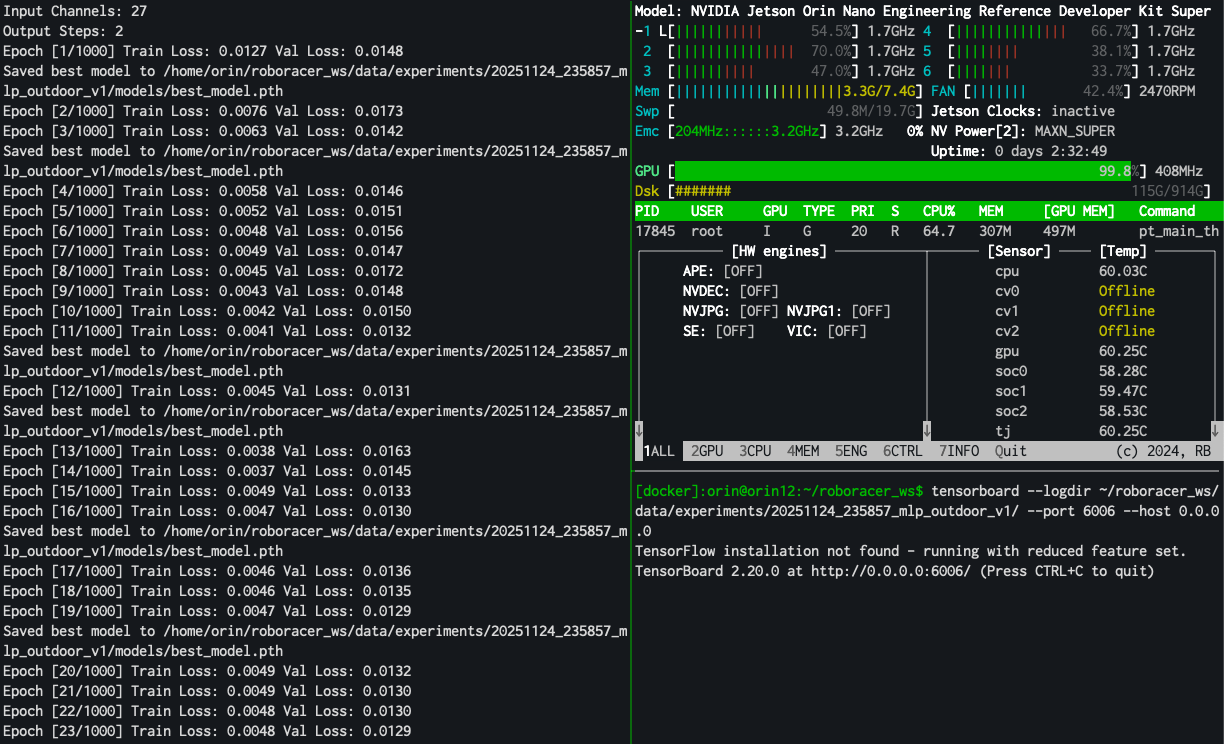
Monitor the training process by watching the tensorboard logs and the output of the training script in the terminal. When training is complete, you'll see a message like this:
Epoch [30/1000] Train Loss: 0.0047 Val Loss: 0.0128
Saved best model to /home/orin/roboracer_ws/data/experiments/20251215_033702_cnn_sidewalk_grey_25min_5hz_h-5s_f-2s/models/best_model.pth
Epoch [31/1000] Train Loss: 0.0047 Val Loss: 0.0130
Epoch [32/1000] Train Loss: 0.0047 Val Loss: 0.0129
Epoch [33/1000] Train Loss: 0.0047 Val Loss: 0.0129
Epoch [34/1000] Train Loss: 0.0047 Val Loss: 0.0129
Epoch [35/1000] Train Loss: 0.0047 Val Loss: 0.0130
Epoch [36/1000] Train Loss: 0.0047 Val Loss: 0.0130
Epoch [37/1000] Train Loss: 0.0047 Val Loss: 0.0130
Epoch [38/1000] Train Loss: 0.0047 Val Loss: 0.0130
Epoch [39/1000] Train Loss: 0.0047 Val Loss: 0.0129
Epoch [40/1000] Train Loss: 0.0046 Val Loss: 0.0128
Early stopping triggered after 40 epochs.
Training finished.
Lab Notebook
Record the number of epochs until your model converged. Also include a screenshot of the training and validation loss curves.
4. Check the Training Curves
Check the training curves to ensure the model converged.
In order to understand how well the training process worked, we will first examine the training curves. If these curves look reasonable, we will then roll out the policy on the car and evaluate its performance.
With tensorboard running (Step 3), open your browser to your development computer's IP address at port 6006, e.g. http://10.1.0.112:6006.
The following screenshot shows three different model architectures trained on the same dataset:
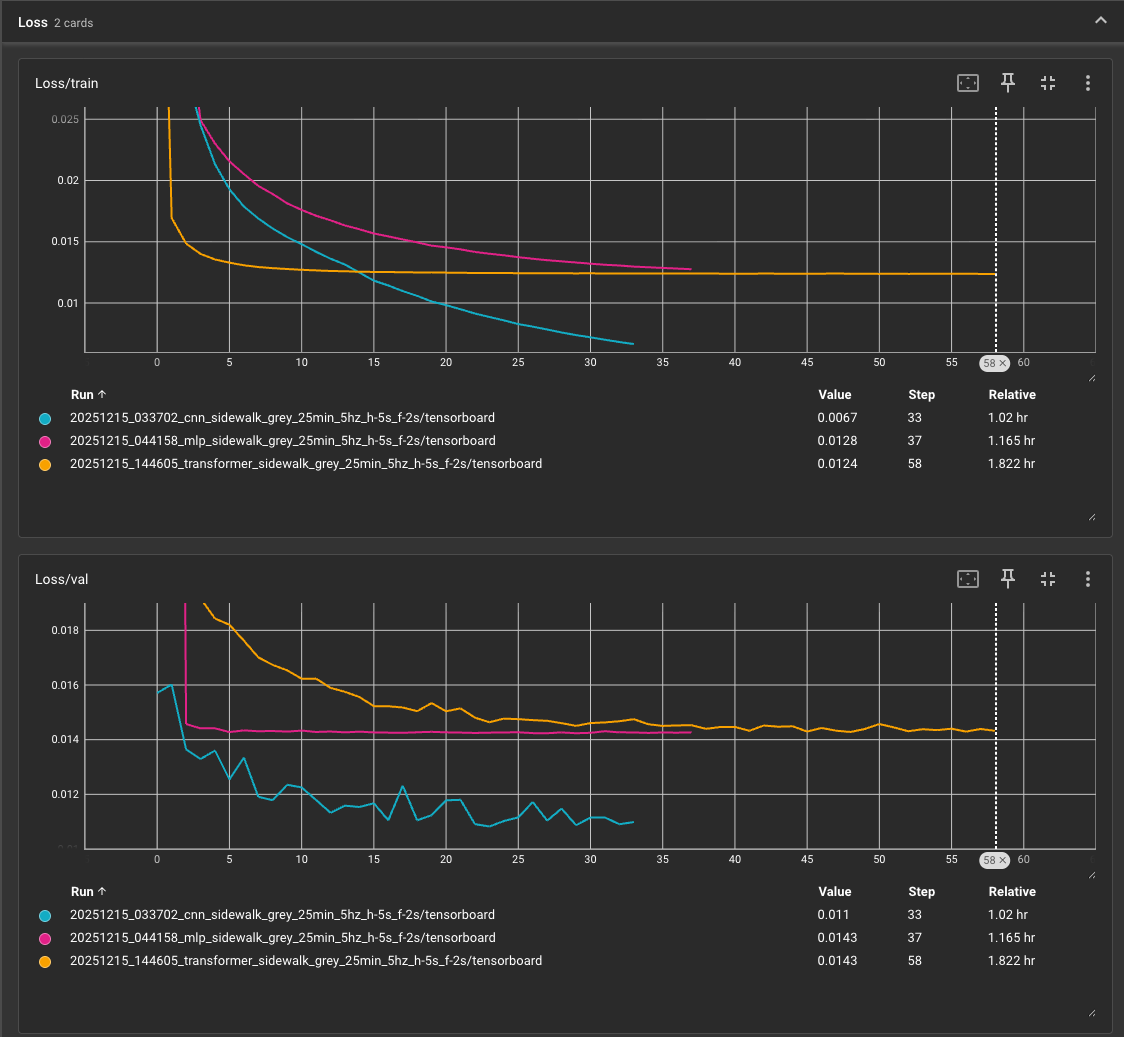
Ideally, the curves should show the training loss continuing to decrease while the validation loss increases.
We are using fast early stopping to prevent overfitting. So, even though you've set the number of epochs to a high value, the training will automatically stop when the validation loss stops decreasing and we'll use the model weights with the lowest validation loss.
5. Check the model's output on the validation set and convert to onnx
Open the model in the webapp's "5. Inference" tab, choose the same dataset that you trained the model on and the validation set, then click "Run Inference."
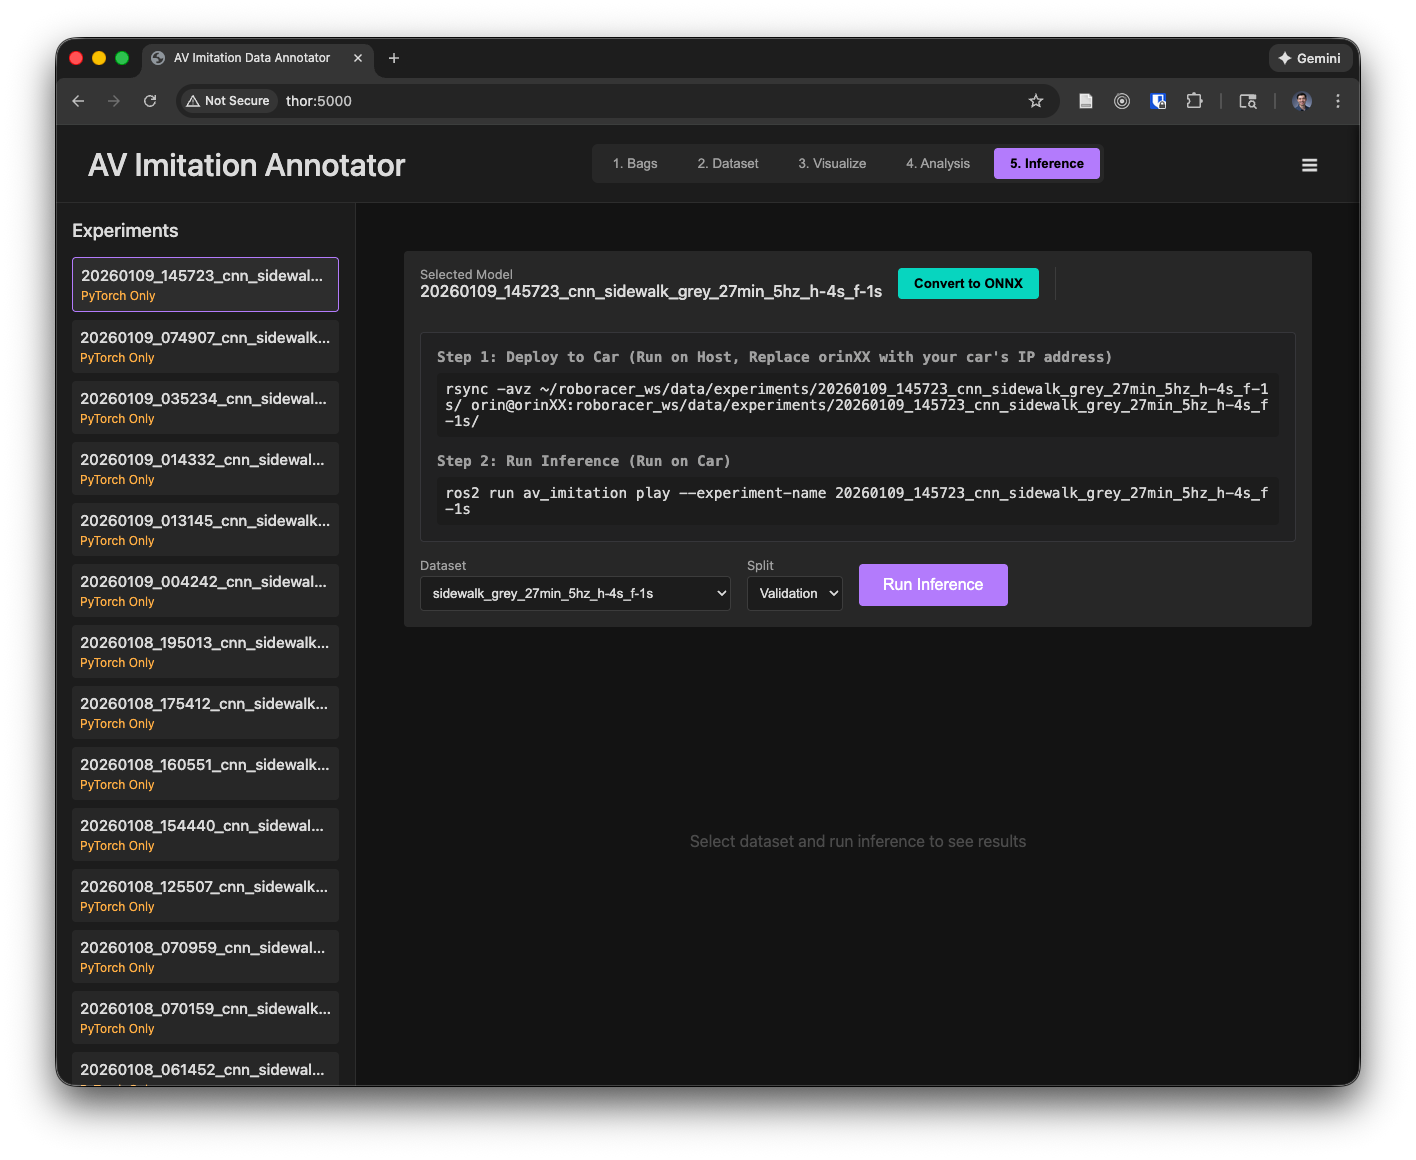
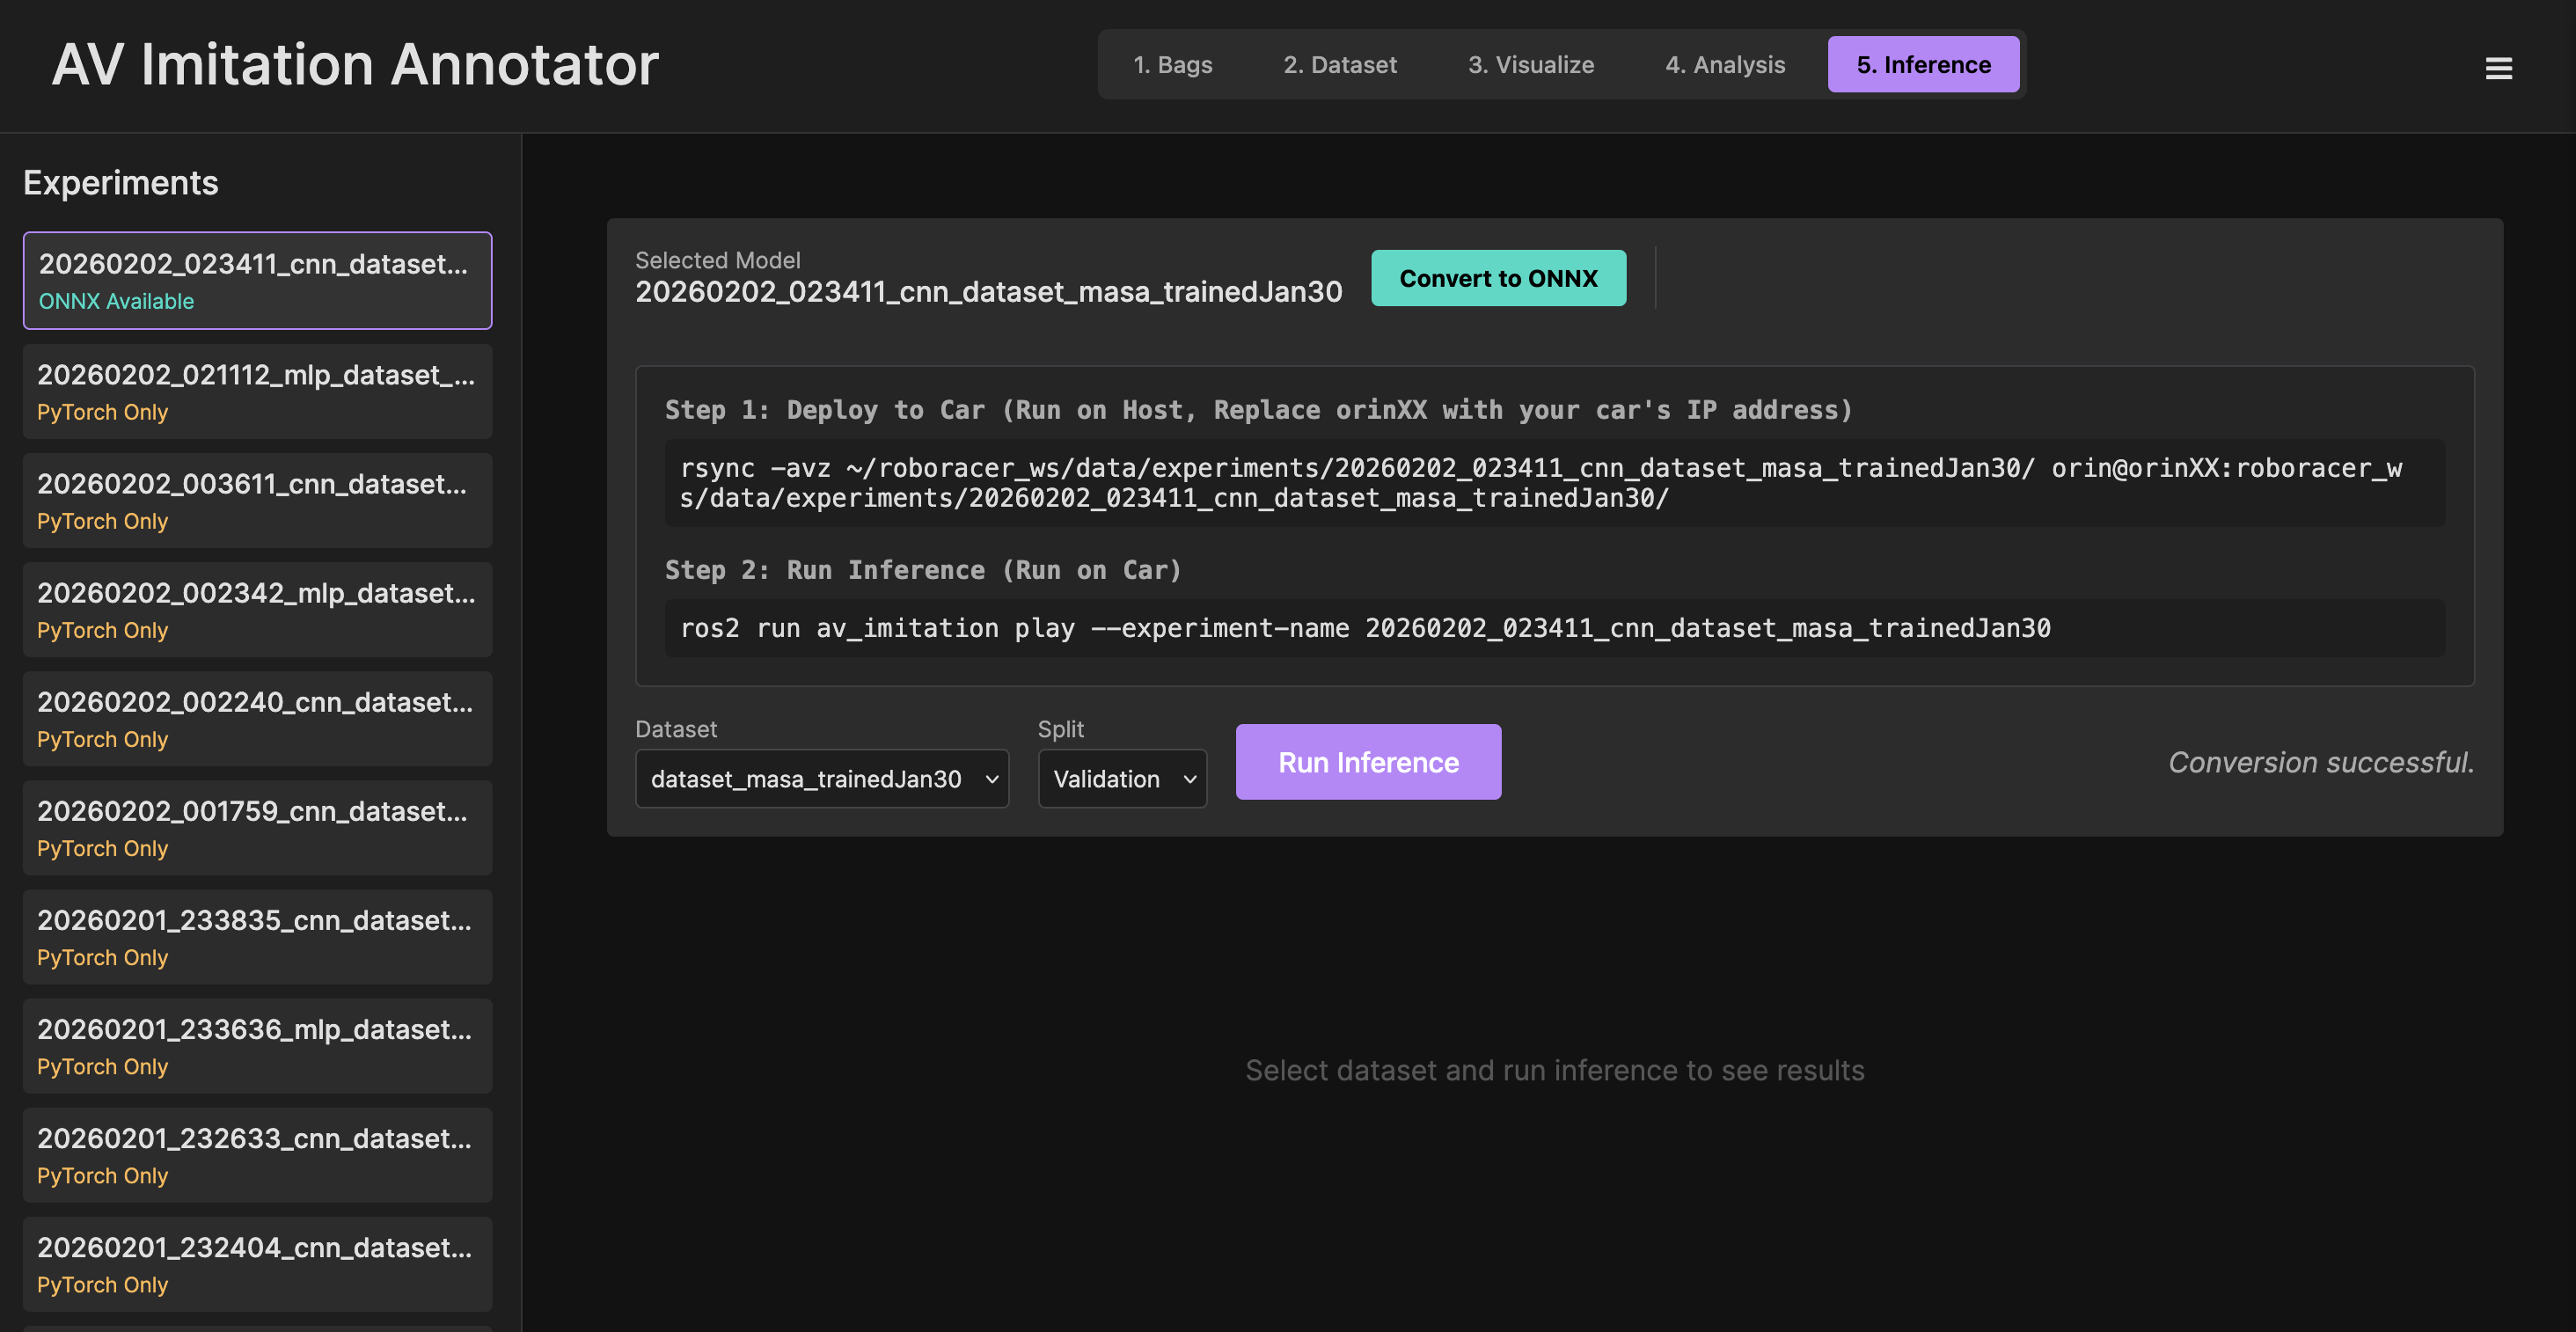
Then, to convert the model to onnx format for inference on the car, open the model in the webapp's "5. Inference" tab, choose the same dataset that you trained the model on and the validation set, then click the "Convert to ONNX" button.
After converting to ONNX, your dataset icon should show the text “ONNX available.”
Alternatively, run the bash command, replacing 20251215_033702_cnn_sidewalk_grey_25min_5hz_h-5s_f-2s with the name of your experiment:
ros2 run av_imitation export_onnx --experiment-name 20251215_033702_cnn_sidewalk_grey_25min_5hz_h-5s_f-2s
6. Rollout the policy on the car
Note: If you trained the policy on a different machine, you will need to copy the onnx file to the car. For example, use this
rsynccommand, run on the training machine, replacingXXwith your car's ID:rsync -avz ~/roboracer_ws/data/experiments/20251215_033702_cnn_sidewalk_grey_25min_5hz_h-5s_f-2s orin@orinXX:roboracer_ws/data/experiments/20251215_033702_cnn_sidewalk_grey_25min_5hz_h-5s_f-2s. If this command errors out because mkdir fails, first ssh into the car and create the directory with teh command:ssh orin@orinXX mkdir -p roboracer_ws/data/experiments/
The node that will inference the policy is ros2 run av_imitation play --experiment-name 20251215_033702_cnn_sidewalk_grey_25min_5hz_h-5s_f-2s.
We have incoporated this node into the imitation_inference tmuxinator config, which also launches the camera, joystick and other required nodes. To use it, run:
Note: Replace
20251215_033702_cnn_sidewalk_grey_25min_5hz_h-5s_f-2swith the name of your experiment
cd ~/roboracer_ws/tmux/imitation_inference
export EXPERIMENT=20251215_033702_cnn_sidewalk_grey_25min_5hz_h-5s_f-2s
tmuxinator
Then, wait for the camera to load, connect the joystick and then to let the car run in autonomous mode, hold the R1 button on the joystick.
7. Collect additional data
Dataset augmentation, or DAgger, is a technique where we collect additional data by running the policy on the car and collecting the data. This can be done by running the policy on the car and collecting the data.
In order to collect this additional data, simply run the inference for your model, and turn on recording by pressing the red circle on the joystick. You will see the recording indicator on the GUI change to green. Then, if the car goes off course, use the joystick to correct the car's path and let it run in autonomous mode again. The recording tool will automatically save the data when you correct the car's path and the "override" topic will be published with a boolean positive value.
Troubleshooting
GPU Out of Memory
If you run into a GPU out of memory error (example error shown below), try reducing the batch size.
$ python3 src/av_imitation/av_imitation/src/main.py --model mlp --dataset outdoor_v1 --epochs 1000 --batch-size 8
Starting experiment: 20251124_235734_mlp_outdoor_v1
Using device: cuda
Loading dataset...
Input Channels: 27
Output Steps: 2
NvMapMemAllocInternalTagged: 1075072515 error 12
NvMapMemHandleAlloc: error 0
NvMapMemAllocInternalTagged: 1075072515 error 12
NvMapMemHandleAlloc: error 0
NvMapMemAllocInternalTagged: 1075072515 error 12
NvMapMemHandleAlloc: error 0
NvMapMemAllocInternalTagged: 1075072515 error 12
NvMapMemHandleAlloc: error 0
NvMapMemAllocInternalTagged: 1075072515 error 12
NvMapMemHandleAlloc: error 0
Traceback (most recent call last):
  File "/home/orin/roboracer_ws/src/av_imitation/av_imitation/src/main.py", line 147, in <module>
    train(args)
  File "/home/orin/roboracer_ws/src/av_imitation/av_imitation/src/main.py", line 88, in train
    optimizer.step()
  File "/usr/local/lib/python3.10/dist-packages/torch/optim/optimizer.py", line 487, in wrapper
    out = func(*args, **kwargs)
  File "/usr/local/lib/python3.10/dist-packages/torch/optim/optimizer.py", line 90, in _use_grad
    ret = func(self, *args, **kwargs)
  File "/usr/local/lib/python3.10/dist-packages/torch/optim/adam.py", line 216, in step
    has_complex = self._init_group(
  File "/usr/local/lib/python3.10/dist-packages/torch/optim/adam.py", line 160, in _init_group
    state["exp_avg_sq"] = torch.zeros_like(
RuntimeError: NVML_SUCCESS == r INTERNAL ASSERT FAILED at "/opt/pytorch/pytorch/c10/cuda/CUDACachingAllocator.cpp":838, please report a bug to PyTorch.