Building Robots in Teams
In this tutorial you will work with your team to learn the basics of ROS2 and create a shared GitHub project. You'll make your first commits allowing you to share code via git. You will set up your editor, learn to use AI Coding tools responsibly, as well as best practices effective collaboration. With the ability to edit and share code, your team will implement several ROS2 nodes to solidify the core concepts of the Robot Operating System.
Learning Objectives
- Understand the basics of ROS2 architecture
- Understand basic Git commands and workflows
- Collaborate effectively using GitHub repositories
- Practice making commits, pushing, and pulling changes
- Set up your coding environment with your teammate
- Use an AI coding agent to assist with coding tasks
- Implement simple ROS2 nodes collaboratively
- Create, build, and run a package with airfield, the tool the car uses to build and launch its software
Deliverables
- A shared GitHub repository with contributions from both students
- Several simple ROS2 nodes implemented collaboratively
Prerequisites
- Have Git installed (
git --versionshould work in the terminal). - Both have GitHub accounts and are logged in.
- Have the VSCode editor installed.
- Have airfield available on the machine you build on (
airfield doctorreports anything it is missing). You used airfield to build and launch the car in the previous tutorial; here you use it to create a package of your own.
git
git is a command-line tool for version control that allows multiple people to work on the same codebase simultaneously. It is closely related to github.com, which is one of the most popular platforms for hosting Git repositories. While git can be self-hosted or hosted on other platforms, such as gitlab.com, we will use github.com in this tutorial and for the class. In this portion of the tutorial, you will create a shared repository on GitHub and practice basic git commands such as clone, add, commit, push, and pull.
This portion of the tutorial should be done on your laptop.
1. Student A creates the repository
- Go to https://github.com and click New repository.
- Check Add a README file.
- Click Create repository.
Now Student A has a GitHub repo!
2. Student A clones the repo to their computer
In a terminal:
git clone https://github.com/<studentA-username>/git-practice.git
cd git-practice
3. Student A makes their first change and pushes it
-
Create a new file, for example:
echo "Hello from Student A" > hello.txt -
Check what’s new:
git status -
Stage and commit the file:
git add hello.txt git commit -m "Add hello.txt from Student A" -
Push to GitHub:
git pushNow, ensure the file is visible on the GitHub website: https://github.com/
/git-practice
4. Student B joins the project
-
Student A should go to the repo on GitHub, open: Settings, Collaborators, Add collaborator, enter Student B’s GitHub username and invite them.
-
Student B accepts the invitation (check email or notifications).
5. Student B clones the repo and pulls the latest changes
git clone https://github.com/<studentA-username>/git-practice.git
cd git-practice
Now Student B has the same files locally.
6. Student B makes a new change and pushes it
-
Add another file:
echo "Hello from Student B" > hello_b.txt -
Stage and commit:
git add hello_b.txt git commit -m "Add hello_b.txt from Student B" -
Push the change:
git push
7. Student A pulls the new changes
Back on Student A’s computer:
git pull
Student A will now see both hello.txt and hello_b.txt locally.
Lab Notebook
Include two screenshots of your terminal. One screenshot should show the contents of the project (run the ls command). One screenshot should show the output of the git log command displaying the commit history with both students' commits.
git Summary
You just:
- Created a GitHub repo
- Made commits
- Pushed and pulled between collaborators
Version control systems are a powerful collaboration tool that allow multiple people to work on the same codebase without conflicts. They track changes, allow you to revert to previous versions, and provide a history of who made what changes.
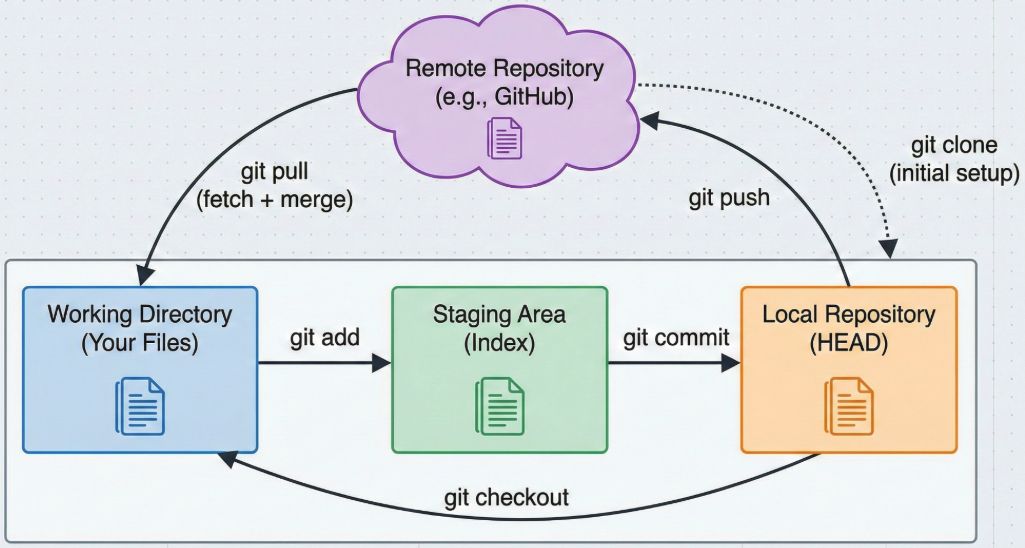
For reference, recall the git workflow is:
make changes -> git add -> git commit -> git push -> git pull -> make changes -> ...
Updating the Code in the Course Repositories
It's good practice to keep your local codebase up to date with the latest changes from the course repositories. This ensures you have access to the most recent tutorials, bug fixes, and features. Follow these steps regularly to sync your local repository with the remote course repository.
The workspace is managed with airfield, which keeps each ROS2 package in its own git repository and records where each one comes from in ~/roboracer_ws/airfield.yaml. Updating is therefore two steps: pull the workspace itself, then pull the packages inside it.
Airfield requires a workspace that has been migrated to it. Check for an
airfield.yamlfile and apackages/folder in~/roboracer_ws. If your machine has asrc/folder and acontainerscript instead, it is still on the older layout and you should follow the fallback instructions below. The full airfield reference for this workspace is at~/roboracer_ws/docs/AIRFIELD.md.
- Navigate to your local repository:
cd ~/roboracer_ws/
- Fetch the latest changes for the workspace itself:
git pull
- Clone any packages that are listed in
airfield.yamlbut are missing from yourpackages/folder:
airfield subpackages checkout
- Pull the latest changes in every package:
airfield subpackages pull
airfield subpackages statusprints the git status of every package at once. Run it before you start working to see which packages have uncommitted changes, and which are behind their remote.
If airfield fails: update with the checkout script
The workspace previously kept its packages in ~/roboracer_ws/src and updated them with a shell script. This flow still works if airfield is unavailable, and it is the only flow available on a machine that has not been migrated.
- Navigate to your local repository:
cd ~/roboracer_ws/
- Fetch the latest changes from the remote repository:
git pull
- Update the repositories in the workspace:
./scripts/checkout.sh
The Robot Operating System (ROS) 2
The robot operating system (ROS) is a flexible framework for writing robot software. It is a collection of tools, libraries, and conventions that aim to simplify the task of creating complex and robust robot behavior across a wide variety of robotic platforms. ROS2 is the second generation of ROS, which includes improvements in performance, security, and real-time capabilities.
ROS2
If you're not familiar with ROS2, read the ROS2 overview.
Creating A New ROS 2 Package
Building systems in teams is a critical skill for robotics researchers. A key challenge in this process is organizing code so that multiple people can work on different parts of the system without conflicts. ROS 2 packages provide a modular way to encapsulate functionality, making it easier to manage and share code among team members.
In this section, you will work in a team to create a new ROS2 package (or two, your choice) in your shared repository. Your implementation should contain two nodes: node A and node B. Node A will publish a simple message, and Node B will subscribe to that message and print it to the console.
Read through the instructions and then decide with your teammate how the work will be fairly divided.
Lab Notebook
Note how you plan to divide the work between team members.
1. ssh into your lab machine ssh <csid>@<lab machine name>.cs.utexas.edu
If you haven't checked out the roboracer_ws repository yet, you can do so by following the instructions on the ROS Workspace documentation page.
2. Create your airfield package
In airfield, a package is the unit everything else is built around: it is one buildable ROS2 package, it becomes one container image, and it is its own git repository. Creating one is the first thing you do, and it happens on the host — there is no container to enter first.
Airfield requires a workspace that has been migrated to it. Check for an
airfield.yamlfile and apackages/folder in~/roboracer_ws. If your lab machine has asrc/folder and acontainerscript instead, follow the container shell instructions at the end of this step. The full airfield reference for this workspace is at~/roboracer_ws/docs/AIRFIELD.md.Note: only one team member should create the new package.
cd ~/roboracer_ws
airfield package init team_tutorial
The output in your terminal should look like this:
jet$ airfield package init team_tutorial
Initialized Airfield package team_tutorial at /u/tsoi/roboracer_ws/packages/team_tutorial
Airfield created the package under packages/:
packages/team_tutorial/
  airfield.yaml     what to build, what to install, and how to run it
  src/              your ROS2 code goes here (empty for now)
  README.md
The airfield.yaml file is short, and it is the file that makes this folder a package:
kind: package
name: team_tutorial
dependencies: []
source_path: src
ros_distro: jazzy
dependenciesare the libraries airfield installs into your package's container image.rclpyandstd_msgscome with the ROS2 base image, so you can leave this list empty. You only add names here when you need something the base image does not ship, and each name has to have a dependency manifest describing how to install it (seedependencies/in the workspace anddocs/AIRFIELD.md).
On a lab machine, override the base image
The workspace airfield.yaml pins a container base image built for the car's Jetson (roboracer/l4t-jazzy:r39.2), and every package inherits it. That image only exists on the cars, so on a lab machine add a base image line to packages/team_tutorial/airfield.yaml:
base_image: osrf/ros:jazzy-desktop
Leave it out when you build the same package on the car, so it inherits the car's image.
If airfield fails: create the package in the container shell
The workspace previously kept its packages in ~/roboracer_ws/src and entered a single container for the whole workspace. This flow still works if airfield is unavailable, and it is the only flow available on a machine that has not been migrated.
If you haven't checked out the
roboracer_wsrepository or built your container yet, be sure to follow the ROS Workspace documentation page.
Be sure to build your container once, before calling ./container shell
Run ./container build once, before calling ./container shell.
cd ~/roboracer_ws
./container shell
Note: read more about what a container is and why we're using it on the containers documentation page.
Then create the ROS2 package in the workspace src directory and exit the container:
cd ~/roboracer_ws/src
ros2 pkg create team_tutorial --build-type ament_python --license MIT --dependencies rclpy std_msgs
exit
Your package is then at ~/roboracer_ws/src/team_tutorial rather than ~/roboracer_ws/packages/team_tutorial/src/team_tutorial. Use that path everywhere the rest of this tutorial refers to your package, and build with colcon build --packages-select team_tutorial from inside the container shell instead of the airfield commands below.
3. Where your source code lives
source_path: src in airfield.yaml tells airfield which folder holds your code. Airfield mounts that folder into the package's container at ~/workspace/src/team_tutorial and starts every command there, so a file you create in the container appears in packages/team_tutorial/src on the host, and a file you edit on the host is immediately visible in the container. There is nothing to copy, and no image to rebuild after editing code.
~/roboracer_ws/packages/team_tutorial/src   (host)
                    ↕  same files
~/workspace/src/team_tutorial               (inside the container)
Note: the shared build output (
~/workspace/build,install, andlogin the container) is mounted the same way, from~/roboracer_ws/.airfield/workspaceon the host. That is why you build a package once and every container that runs it sees the result.
4. Create a new ROS2 package named team_tutorial with dependencies on rclpy and std_msgs using the ros2 pkg create command
ros2 is installed in the package's container, not on the host, so run it through airfield. airfield package cmd <package> -- <command> builds the package image if it does not exist yet, then runs one command inside it:
airfield package cmd team_tutorial -- ros2 pkg create team_tutorial --build-type ament_python --license MIT --dependencies rclpy std_msgs
The first run builds your container image and takes a few minutes. Later runs reuse it and start in about a second.
The output in your terminal should look like this:
jet$ airfield package cmd team_tutorial -- ros2 pkg create team_tutorial --build-type ament_python --license MIT --dependencies rclpy std_msgs
Loading package team_tutorial...
Build successful. Running command in airfield-pkg-team_tutorial:latest: ros2 pkg create team_tutorial --build-type ament_python --license MIT --dependencies rclpy std_msgs
going to create a new package
package name: team_tutorial
destination directory: /home/tsoi/workspace/src/team_tutorial
package format: 3
version: 0.0.0
description: TODO: Package description
maintainer: ['tsoi <nathan.tsoi@utexas.edu>']
licenses: ['MIT']
build type: ament_python
dependencies: ['rclpy', 'std_msgs']
creating folder ./team_tutorial
creating ./team_tutorial/package.xml
creating source folder
creating folder ./team_tutorial/team_tutorial
creating ./team_tutorial/setup.py
creating ./team_tutorial/setup.cfg
creating folder ./team_tutorial/resource
creating ./team_tutorial/resource/team_tutorial
creating ./team_tutorial/team_tutorial/__init__.py
creating folder ./team_tutorial/test
creating ./team_tutorial/test/test_copyright.py
creating ./team_tutorial/test/test_flake8.py
creating ./team_tutorial/test/test_pep257.py
The command ran in the container, but the files it wrote are on the host. Check with the pwd and ls commands:
jet$ cd ~/roboracer_ws/packages/team_tutorial
jet$ pwd
/u/tsoi/roboracer_ws/packages/team_tutorial
jet$ ls src/team_tutorial
LICENSE  package.xml  resource  setup.cfg  setup.py  team_tutorial  test
If you want an interactive shell in the container instead of a single command, use
airfield package shell team_tutorial. It is the airfield equivalent of the old./container shell, except that it is scoped to one package and it starts you in that package's source folder. Typeexitto leave it.
5. Initialize git in your new package
Note: only one team member should initialize the git repository.
In order to create a new git repository and share the code with your partner for your new ros package, you will run the git init command from the root directory of the project.
Initialize git at the root of the airfield package, packages/team_tutorial, not at the ROS2 package inside it. That way the repository holds both your code and the airfield.yaml that says how to build and run it, and your teammate gets a package that works as soon as they clone it.
Use the pwd command to check your current directory. You should be in your new team_tutorial package.
jet$ pwd
/u/tsoi/roboracer_ws/packages/team_tutorial
Now run the git init command to initialize the git repository, you'll see this output:
jet$ git init .
hint: Using 'master' as the name for the initial branch. This default branch name
hint: will change to "main" in Git 3.0. To configure the initial branch name
hint: to use in all of your new repositories, which will suppress this warning,
hint: call:
hint:
hint:  git config --global init.defaultBranch <name>
hint:
hint: Names commonly chosen instead of 'master' are 'main', 'trunk' and
hint: 'development'. The just-created branch can be renamed via this command:
hint:
hint:  git branch -m <name>
hint:
hint: Disable this message with "git config set advice.defaultBranchName false"
Initialized empty Git repository in /u/tsoi/roboracer_ws/packages/team_tutorial/.git/
Check the status of your git repository by running git status.
Note: that
git statusis a great command to run anytime you're wondering what state your git repository is in.
You should see output in your terminal like this:
jet$ git status
On branch master

No commits yet

Untracked files:
  (use "git add <file>..." to include in what will be committed)
 .dockerignore
 .gitignore
 README.md
 airfield.yaml
 src/

nothing added to commit but untracked files present (use "git add" to track)
All of the files are currently "untracked" meaning that git does not know about them.
The
.gitignorethatairfield package initwrote already excludes the build output (build/,install/,log/), airfield's scratch folder (.airfield/), and the per-machine.airconfig. Those are generated files that differ on every machine, so they should never be committed.
Add all the files in the current directory (represented by the .) to git with the git add . command:
git add .
Check the git status again and you'll see that all the files are now ready to be committed (aka "staged"):
jet$ git status
On branch master

No commits yet

Changes to be committed:
  (use "git rm --cached <file>..." to unstage)
 new file:   .dockerignore
 new file:   .gitignore
 new file:   README.md
 new file:   airfield.yaml
 new file:   src/team_tutorial/LICENSE
 new file:   src/team_tutorial/package.xml
 new file:   src/team_tutorial/resource/team_tutorial
 new file:   src/team_tutorial/setup.cfg
 new file:   src/team_tutorial/setup.py
 new file:   src/team_tutorial/team_tutorial/__init__.py
 new file:   src/team_tutorial/test/test_copyright.py
 new file:   src/team_tutorial/test/test_flake8.py
 new file:   src/team_tutorial/test/test_pep257.py
So, we can commit the staged files with the git commit command:
Note: every git commit needs a descriptive message. The
-mflag allows you to easily add this commit message. Run:
git commit -m "Initial commit"
Note: If you haven't configured your git username and email, or they were configured automatically, for example, on the lab machines, you'll be prompted to do this before pushing. Follow the instructions returned by the
git commitcommand as necessary
The output will look something like this:
[master (root-commit) d2e1091] Initial Commit
 13 files changed, 228 insertions(+)
 create mode 100644 .dockerignore
 create mode 100644 .gitignore
 create mode 100644 README.md
 create mode 100644 airfield.yaml
 create mode 100644 src/team_tutorial/LICENSE
 create mode 100644 src/team_tutorial/package.xml
 create mode 100644 src/team_tutorial/resource/team_tutorial
 create mode 100644 src/team_tutorial/setup.cfg
 create mode 100644 src/team_tutorial/setup.py
 create mode 100644 src/team_tutorial/team_tutorial/__init__.py
 create mode 100644 src/team_tutorial/test/test_copyright.py
 create mode 100644 src/team_tutorial/test/test_flake8.py
 create mode 100644 src/team_tutorial/test/test_pep257.py
You can run git status again to see that your files are now committed and you'll see:
jet$ git status
On branch master
nothing to commit, working tree clean
But it looks like your files are gone? No, they're just tracked by git now. You can see the commit you just made by running git log:
jet$ git log
commit d2e10917d932dcd7071d5d043c8f532cdcec56d2 (HEAD -> master)
Author: Nathan Tsoi <tsoi@cs.utexas.edu>
Date:   Wed Jan 14 10:40:46 2026 -0600

    Initial Commit
Now that your local git repository is up to date, we'll share our code by pushing it to github.
Try to push the files to the remote repository using the git push command, it will fail with a useful error message:
jet$ git push
fatal: No configured push destination.
Either specify the URL from the command-line or configure a remote repository using

    git remote add <name> <url>

and then push using the remote name

    git push <name>
This means that we need to configure our new project with a remote repository, telling git where it should push the code.
Go to github.com and create a new repository. Name it team_tutorial, leaving all the other configurations as default. Importantly, don't initialize the repository with a README.
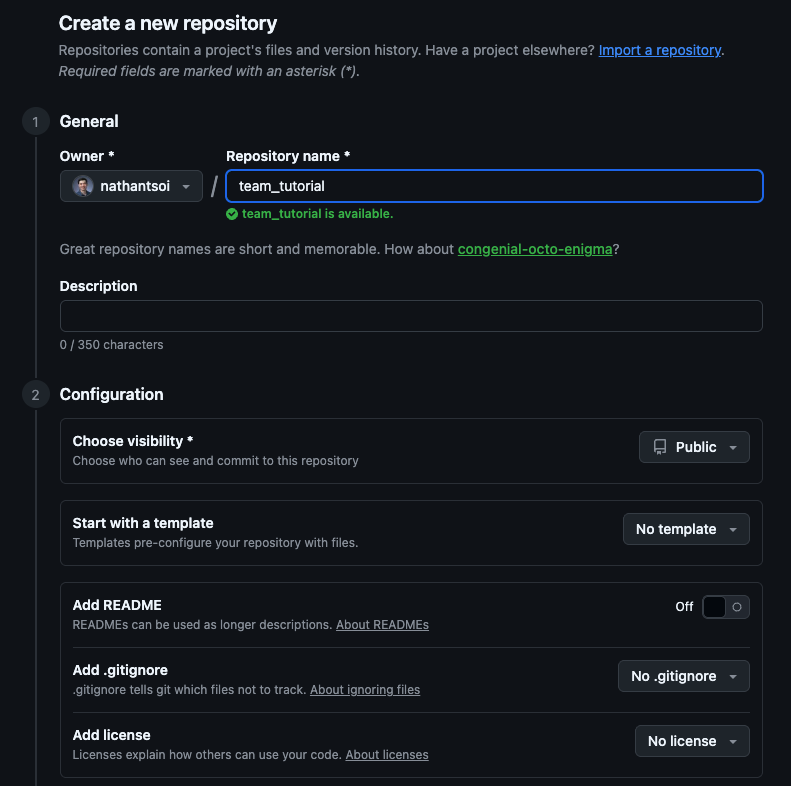
Note: be sure to go to "Settings" in your new repository and share it with your team members.
Upon creation, you'll be presented with a series of commands to run to push to your new repository, we've already completed most of the steps. The only command you need to run is the git remote add command. Be sure to use the correct URL for your repository:
git remote add origin git@github.com:nathantsoi/team_tutorial.git
Once you've configured the remote repository, you can push your code to it using the git push command, this command will fail again, but when it does, re-run the command with the suggested flag. This is what it will look like the first time:
jet$ git push
fatal: The current branch master has no upstream branch.
To push the current branch and set the remote as upstream, use

    git push --set-upstream origin master

To have this happen automatically for branches without a tracking
upstream, see 'push.autoSetupRemote' in 'git help config'.
Then re-run it with the --set-upstream flag:
git push --set-upstream origin master
Now, check github to make sure your new project has been pushed. You should see the code on github:
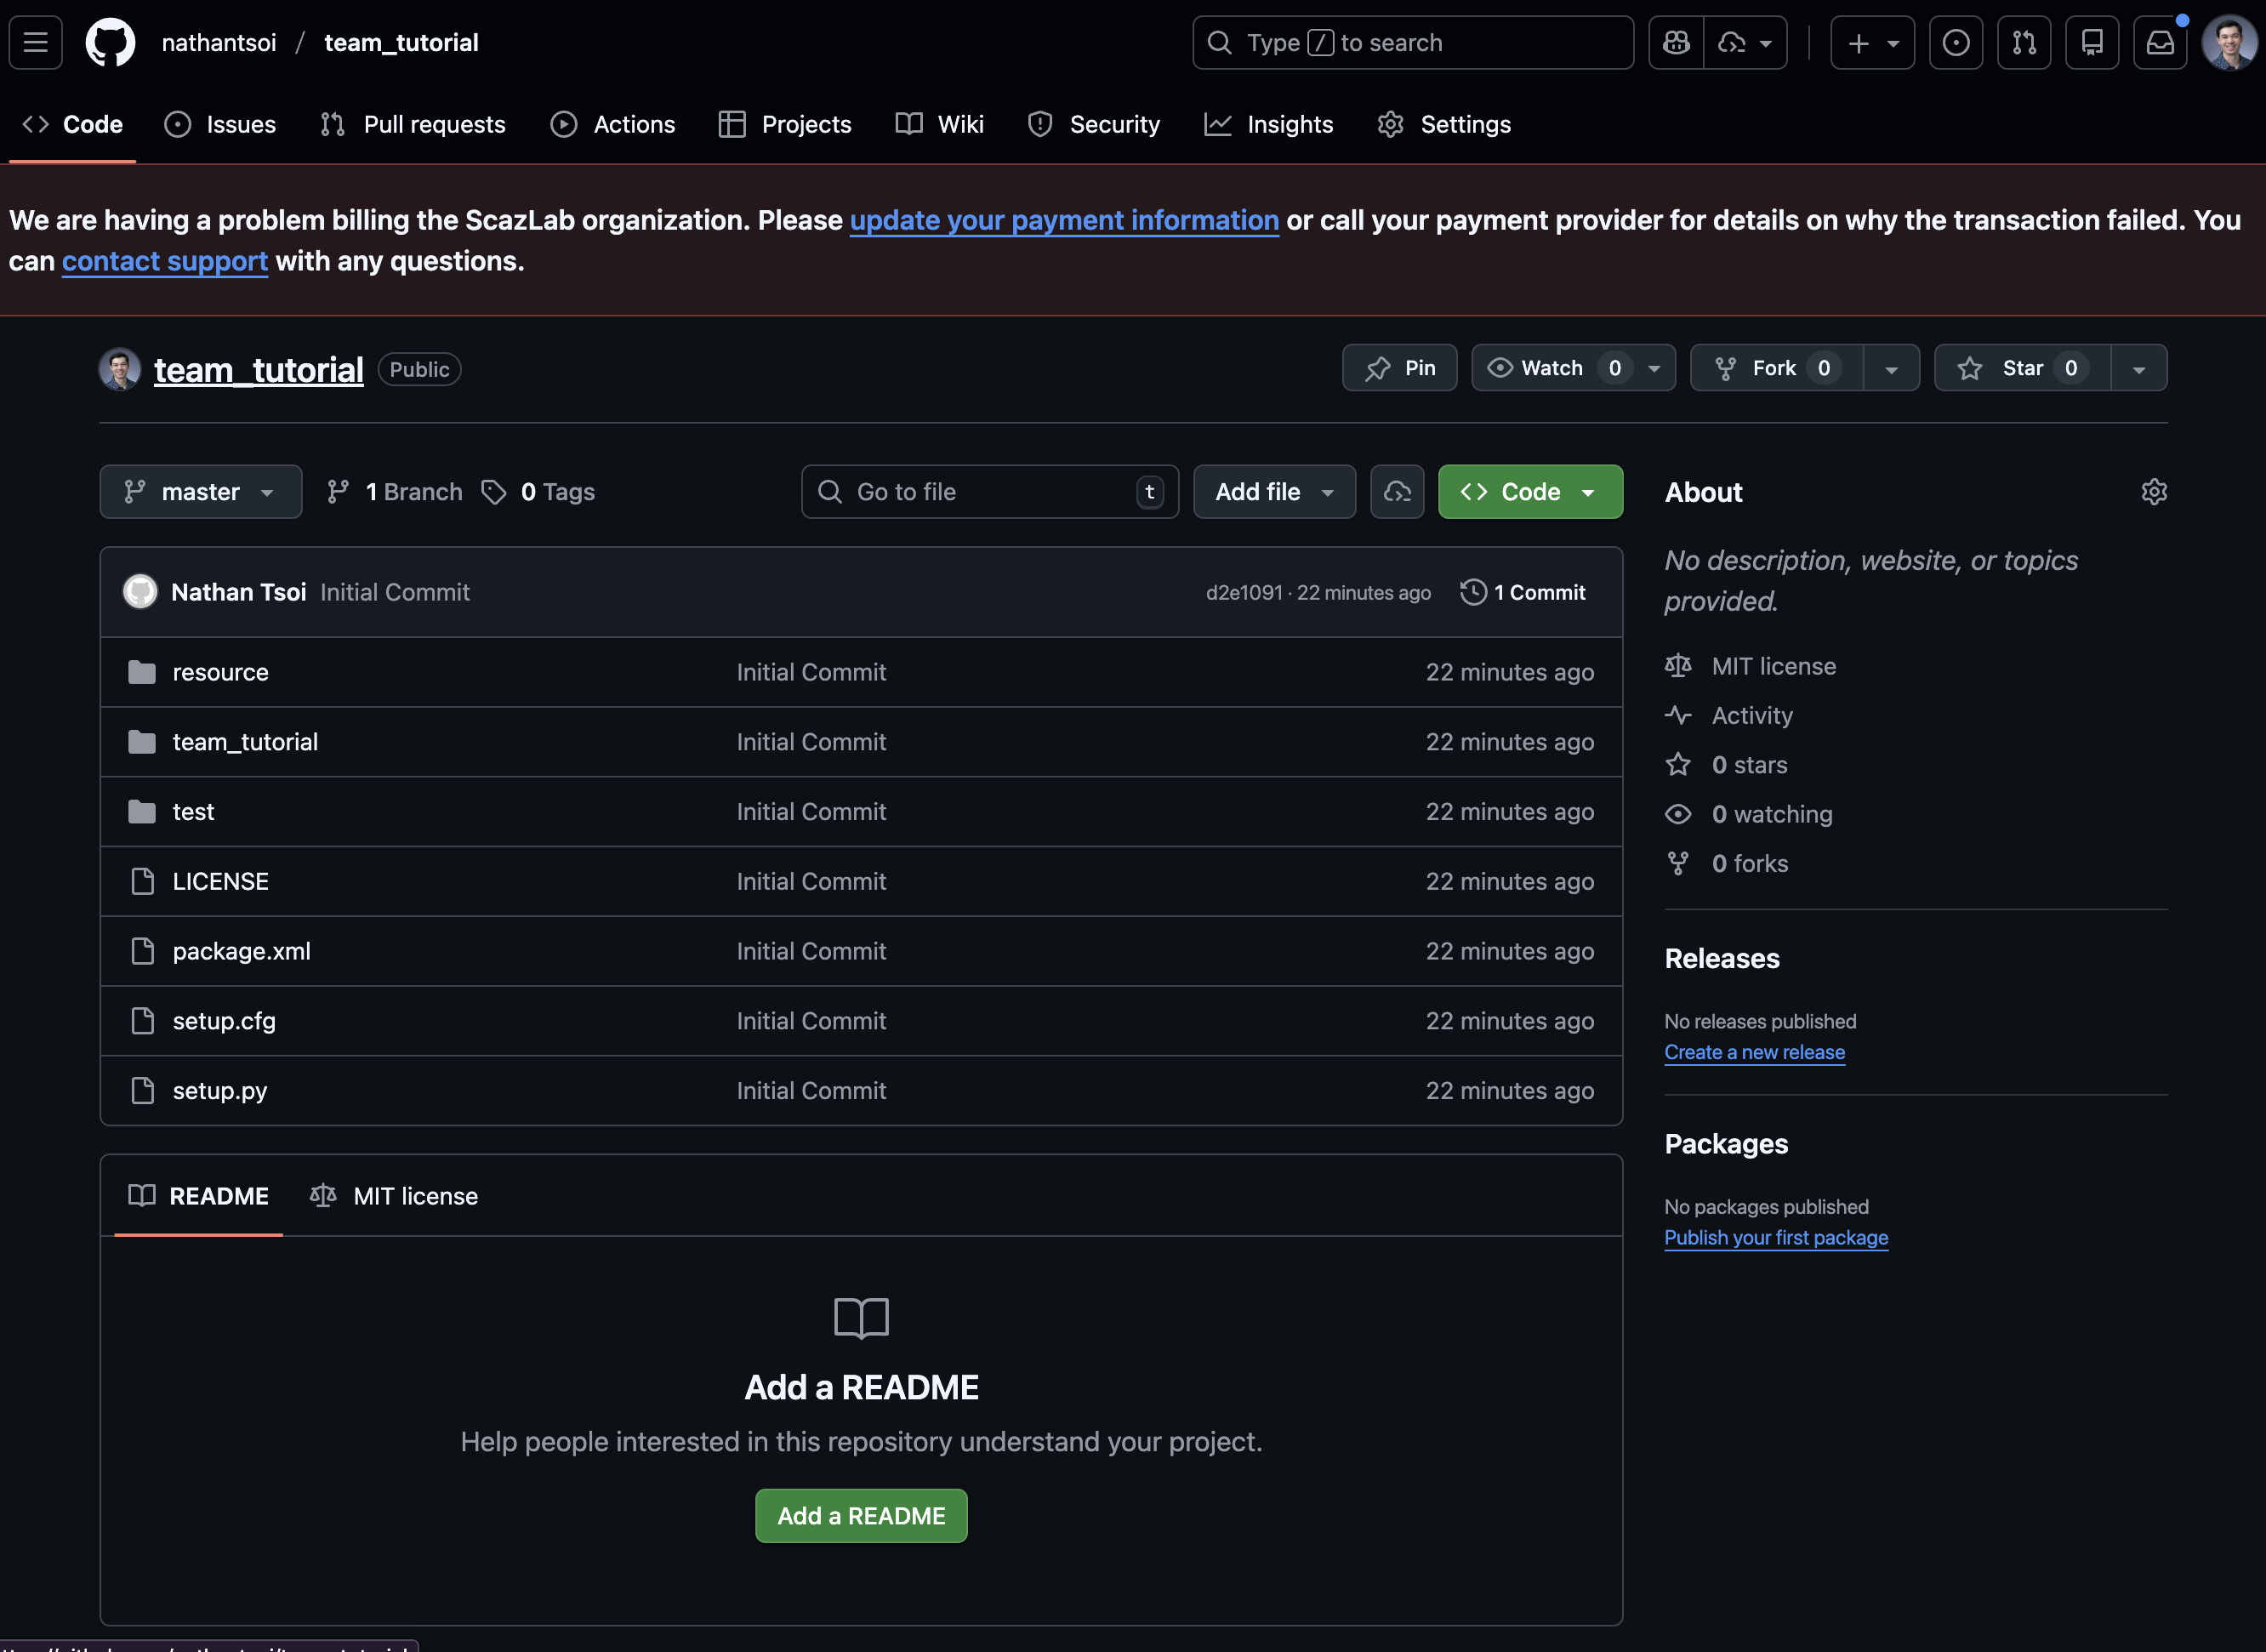
Have your partner checkout the new repository.
Your package now has a home on GitHub, but the workspace does not know about it yet. Record it in the workspace so anyone can restore it later. Run this from the workspace root:
cd ~/roboracer_ws
airfield subpackages track
Airfield reads the remote URL and branch from your package's git repository and adds them to the subprojects list in ~/roboracer_ws/airfield.yaml:
subprojects:
  team_tutorial:
    url: git@github.com:nathantsoi/team_tutorial.git
    version: master
Your partner can then clone every package the workspace knows about, including yours, with one command:
cd ~/roboracer_ws
airfield subpackages checkout
This is the same mechanism that brings in the course packages (
ut_automata,av_navigation, and the rest). Each one is an independent repository with its own history and its own collaborators, and the project'sairfield.yamlis the list that ties them together.
If airfield fails: share the package by hand
Without airfield, there is no list of packages to track. Your partner clones your repository directly into the workspace source folder:
cd ~/roboracer_ws/src
git clone git@github.com:nathantsoi/team_tutorial.git
6. Implement the two nodes in separate Python files within the team_tutorial package
Remember to fairly divide the work between team members. Also, you can
git add,git commit, andgit pusheach step, practicing making small commits with logical changes.
The contents of your package will go inside of a folder called team_tutorial inside of the ROS2 package that ros2 pkg create made for you. Create the files node_a.py and node_b.py inside of that folder:
cd ~/roboracer_ws/packages/team_tutorial/src/team_tutorial/team_tutorial
touch node_a.py node_b.py
You can check the folder contents to see if the files were created:
cd ~/roboracer_ws/packages/team_tutorial/src/team_tutorial/team_tutorial
ls
__init__.py  node_a.py node_b.py
You are editing these files on the host, with your normal editor. They are the same files the container sees at
~/workspace/src/team_tutorial/team_tutorial, so there is nothing to sync.
7. Edit node_a.py to publish a simple message
Note: now is a great time to start up your editor, like VSCode and open your new project directory (
~/roboracer_ws/packages/team_tutorial) to edit the project files.
#!/usr/bin/env python3

import rclpy
from rclpy.node import Node
from std_msgs.msg import String

class NodeA(Node):
    def __init__(self):
        super().__init__('node_a')
        self.publisher_ = self.create_publisher(String, 'hello', 10)
        self.timer = self.create_timer(1.0, self.timer_callback)

    def timer_callback(self):
        msg = String()
        msg.data = 'Hello from Node A'
        self.publisher_.publish(msg)
        self.get_logger().info(f'Publishing: {msg.data}')

def main(args=None):
    rclpy.init(args=args)
    node_a = NodeA()
    rclpy.spin(node_a)
    rclpy.shutdown()

if __name__ == '__main__':
    main()
8. Register the node in setup.py
To run the node using ros2 run, you need to register the entry point in setup.py. Open setup.py and add the following line to the entry_points console_scripts list:
The
setup.pyfile
    entry_points={
        'console_scripts': [
            'node_a = team_tutorial.node_a:main',
        ],
    },
9. Build the workspace to install the new node
colcon is the ROS2 build tool, and like ros2 it lives in the container. Run it through airfield, from the shared workspace root (~/workspace) inside the container, so the result lands in the shared install/ folder that every container reads:
cd ~/roboracer_ws
airfield package cmd team_tutorial -- bash -lc "cd ~/workspace && colcon build --packages-select team_tutorial"
You'll get output like this:
jet$ airfield package cmd team_tutorial -- bash -lc "cd ~/workspace && colcon build --packages-select team_tutorial"
Loading package team_tutorial...
Build successful. Running command in airfield-pkg-team_tutorial:latest: bash -lc 'cd ~/workspace && colcon build --packages-select team_tutorial'
Starting >>> team_tutorial
Finished <<< team_tutorial [1.04s]

Summary: 1 package finished [1.48s]
"Build successful" in the second line refers to the container image, not to your ROS2 code. Airfield makes sure the image is up to date before it runs anything in it. The
colconlines below it are your package being compiled.
Unlike the old workflow, you do not need to source install/setup.bash afterwards. Every airfield command starts a fresh login shell in the container, and that shell sources ~/workspace/install/setup.bash for you, so the next command already knows about the node you just built.
Airfield will also build a package for you the first time you run something from it, so if you forget this step, the
ros2 runcommand in the next section buildsteam_tutorialbefore starting the node. It only does that when the package has never been built; after you change your code, rebuild it yourself with the command above.
If airfield fails: build in the container shell
The workspace previously built every package at once from a single container shell. This flow still works if airfield is unavailable.
cd ~/roboracer_ws
./container shell
colcon build --packages-select team_tutorial
You'll get output like this:
[docker]:tsoi@jet:~/roboracer_ws$ colcon build --packages-select team_tutorial
[0.394s] colcon.colcon_ros.prefix_path.ament WARNING The path '/home/tsoi/roboracer_ws/src/amrl_maps/install' in the environment variable AMENT_PREFIX_PATH doesn't exist
[0.394s] colcon.colcon_ros.prefix_path.ament WARNING The path '/home/tsoi/roboracer_ws/src/amrl_msgs/install' in the environment variable AMENT_PREFIX_PATH doesn't exist
Starting >>> team_tutorial
Finished <<< team_tutorial [1.04s]

Summary: 1 package finished [1.48s]
In that flow you do have to re-source the environment variables in your shell after creating a package, by running source install/setup.bash. There is no output from this command, so the expected output is an empty line:
[docker]:tsoi@jet:~/roboracer_ws$ source install/setup.bash
[docker]:tsoi@jet:~/roboracer_ws$
10. Edit node_b.py to subscribe to the message and print it
#!/usr/bin/env python3

import rclpy
from rclpy.node import Node
from std_msgs.msg import String

class NodeB(Node):
    def __init__(self):
        super().__init__('node_b')
        self.subscription = self.create_subscription(
            String,
            'hello',
            self.listener_callback,
            10)
        self.subscription  # prevent unused variable warning

    def listener_callback(self, msg):
        self.get_logger().info(f'Received: {msg.data}')

def main(args=None):
    rclpy.init(args=args)
    node_b = NodeB()
    rclpy.spin(node_b)
    rclpy.shutdown()

if __name__ == '__main__':
    main()
11. Register the node in setup.py
Add the entry point for node_b to setup.py:
entry_points={
    'console_scripts': [
        'node_a = team_tutorial.node_a:main',
        'node_b = team_tutorial.node_b:main',
    ],
},
12. Rebuild the workspace
Make the Python files executable:
cd ~/roboracer_ws/packages/team_tutorial/src/team_tutorial/team_tutorial
chmod +x node_a.py node_b.py
Then rebuild, the same way you built the first time:
cd ~/roboracer_ws
airfield package cmd team_tutorial -- bash -lc "cd ~/workspace && colcon build --packages-select team_tutorial"
Rebuild whenever you change your code or add an entry point.
colcon buildcopies your Python files intoinstall/, so the running nodes use the built copy rather than the file you just edited.
If airfield fails: rebuild in the container shell
cd ~/roboracer_ws
./container shell
colcon build --packages-select team_tutorial
source install/setup.bash
Running the Nodes
Open 2 shell windows by using tmux panes.
In the first pane, run Node A:
airfield package cmd team_tutorial -- ros2 run team_tutorial node_a
In the second pane, run Node B:
airfield package cmd team_tutorial -- ros2 run team_tutorial node_b
You should see Node A publishing messages and Node B receiving and printing them.
Each command starts its own container from your package's image. The containers share the host's network and inter-process communication, so the two nodes discover each other exactly as they would if you had run them directly on the machine. Stop either node with Ctrl+C; airfield removes its container when it exits.
Lab Notebook
Include screenshots of both terminal panes showing Node A publishing messages and Node B receiving them.
Naming the commands in airfield.yaml
Typing the full command each time gets old, and a teammate who clones your package has no way of knowing how it is meant to be run. Record the commands in your package's airfield.yaml under a run: map:
kind: package
name: team_tutorial
dependencies: []
source_path: src
ros_distro: jazzy
run:
  default: ros2 run team_tutorial node_a
  node_a: ros2 run team_tutorial node_a
  node_b: ros2 run team_tutorial node_b
Then run them by name:
airfield package run team_tutorial node_a
airfield package run team_tutorial node_b
Commit the change so your partner gets the commands along with the code. This is how every package in the workspace documents what it can do; airfield package run team_tutorial with no name lists the available commands.
Launching both nodes with a plan
In the previous tutorial you launched the whole car with airfield project up teleop. A plan is just a file listing the panes to open and the command each one runs, so you can write one for your own two nodes. Create ~/roboracer_ws/plans/team_tutorial.yaml:
name: team_tutorial
windows:
  - name: nodes
    layout: even-horizontal
    panes:
      - package: team_tutorial
        cmd: ros2 run team_tutorial node_a
      - package: team_tutorial
        cmd: ros2 run team_tutorial node_b
Launch it, and tear it down when you are done:
airfield project up team_tutorial
airfield project down
This opens one tmux window with both nodes side by side, which is the same thing the car does with a dozen panes when it brings up teleoperation.
As in the previous tutorial, always shut down with
airfield project downrather than killing the tmux session, so the containers stop with it.
If airfield fails: run the nodes in the container shell
Open 2 shell windows by using tmux panes and enter the container shell in each one:
cd ~/roboracer_ws
./container shell
In the first pane, run Node A:
ros2 run team_tutorial node_a
In the second pane, run Node B:
ros2 run team_tutorial node_b
Commit any remaining changes
Make sure your code is up to date on github by committing your changes and pushing to github.
When you're done, your git status should look like this:
jet$ git status
On branch master
Your branch is up to date with 'origin/master'.
Because the workspace is a collection of separate repositories, it is easy to leave changes behind in one of them. From the workspace root, check all of them at once:
cd ~/roboracer_ws
airfield subpackages status
airfield subpackages commit -m "your message"andairfield subpackages pushwork across every package that has changes, which is useful once you are editing more than one. Both ask you to confirm each package before they touch it.
Lab Notebook
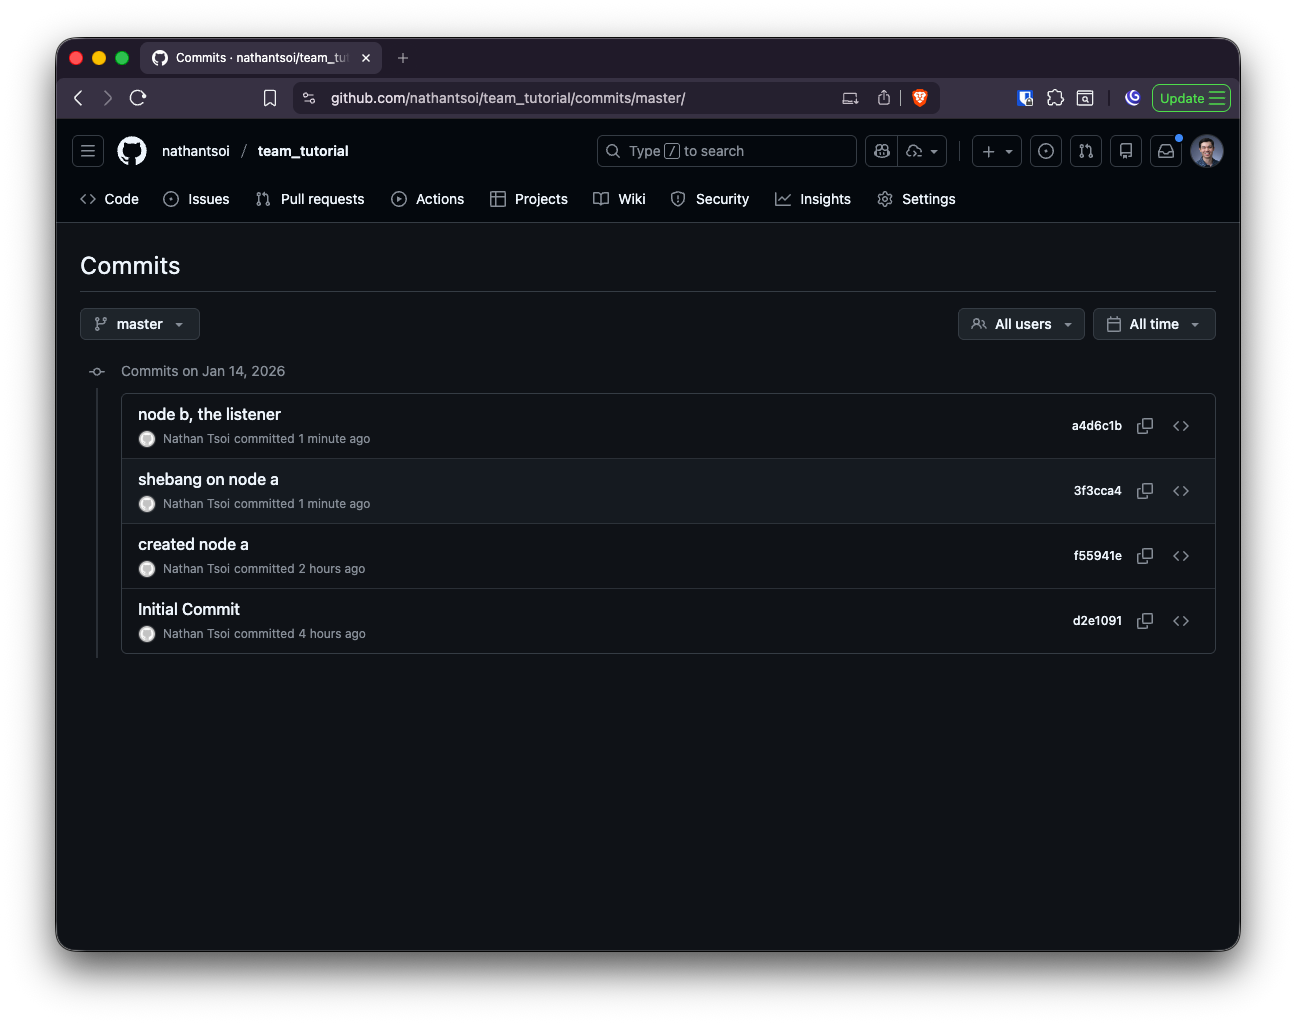
Include a screenshot of your shared repositories commits.
For example: